TUTORIAL: Learn How to Generate AI Videos with Sora 2
Published on
OpenAI’s Sora 2 arrived making a lot of noise on social media with the high quality of its generated videos. But it initially came as an app available only in the United States and Canada, and only by invitation, which extremely limited the number of people with access.
Luckily, the API for this model was released just a few days later, and now everybody can play at creating high-quality videos and movies, with audio (in English only, for now).
This tutorial aims to teach non-programmers how to use code, get access to this model and generate their own videos. Let’s go!
Step 1: Setting up your environment
The first step is to set up the environment on your laptop. You’ll need to install some version of Python, and also a code editor to run it in.
- For Python, just go to this link https://www.python.org/downloads/ to download the latest version, and then install it normally.
- For the code editor, I suggest downloading and installing VS Code, which is open, free and widely used: https://code.visualstudio.com/
Step 2: Creating an API Key
For those who don’t know, an API Key is basically your access key inside a service, something we can compare to a username and password. It’s how OpenAI will know it’s you who wants to create this video (and that it’s your credit card it has to charge).
To create one, let’s start at OpenAI’s platform page: https://platform.openai.com/docs/overview
In the top right corner, click “Log in” and enter your OpenAI user details (the same ones you use to log into ChatGPT). If you don’t have a ChatGPT account, just create one with the “Sign up” button next to it.
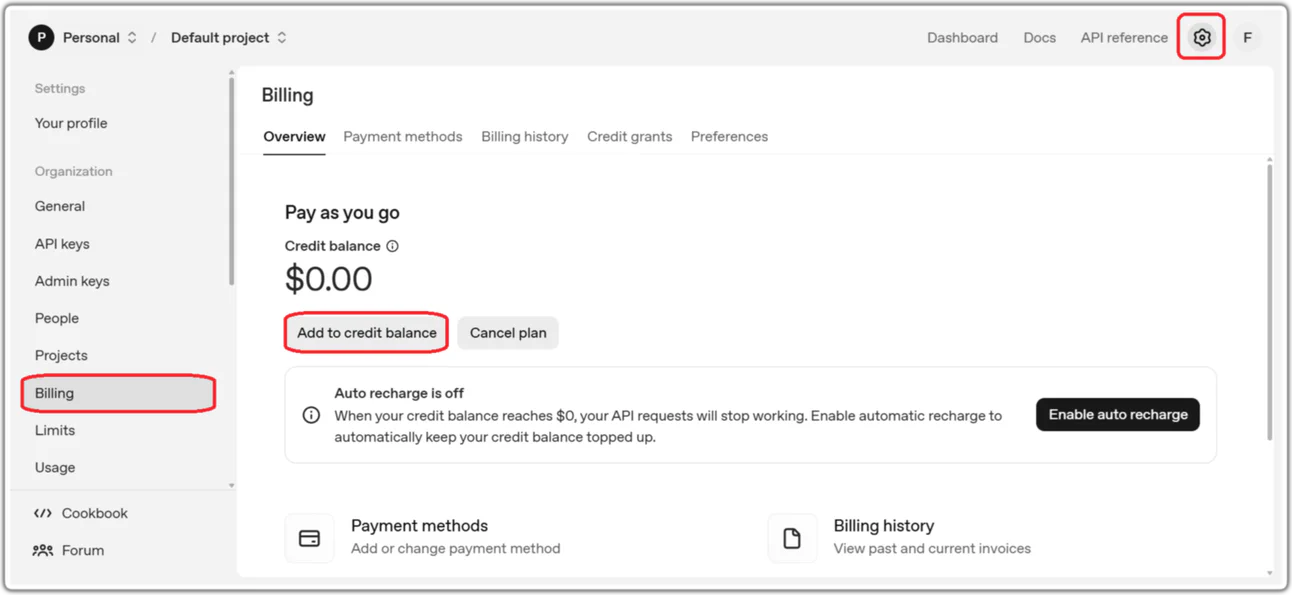
Once logged in, click the gear icon in the top right corner to go to the settings, and there, in the left menu, go to the “Billing” tab. Here, you’ll have to enter your credit card details under “Add payment details”, and buy some amount in credits. If you just want to play around a little, I figure 5 or 10 dollars should be enough to get started (especially since the dollar isn’t exactly cheap right now, haha).
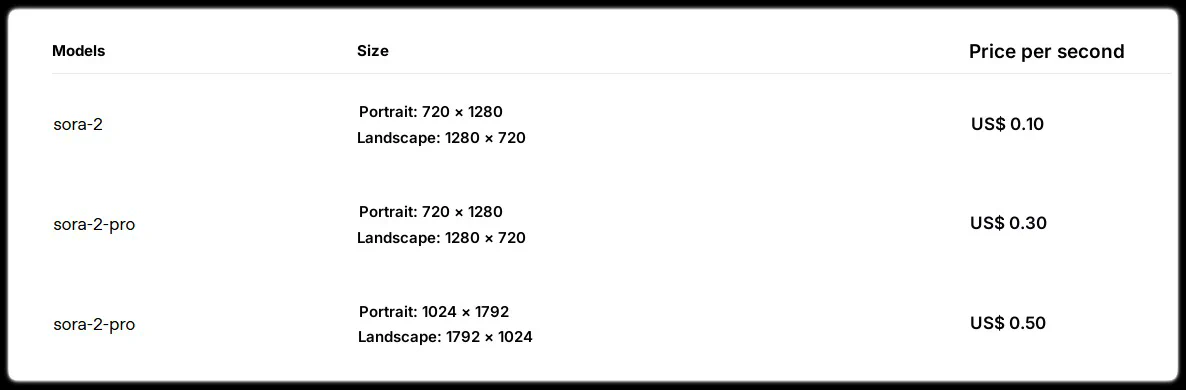
The price to create videos varies a lot depending on the model you choose (Sora 2 or Sora 2 Pro), the resolution (720p or 1080p) and the duration (4s, 8s or 12s) of the video. Below is the price list as of October 2025, and you can decide how many credits you want to buy based on it and on what you want to create:
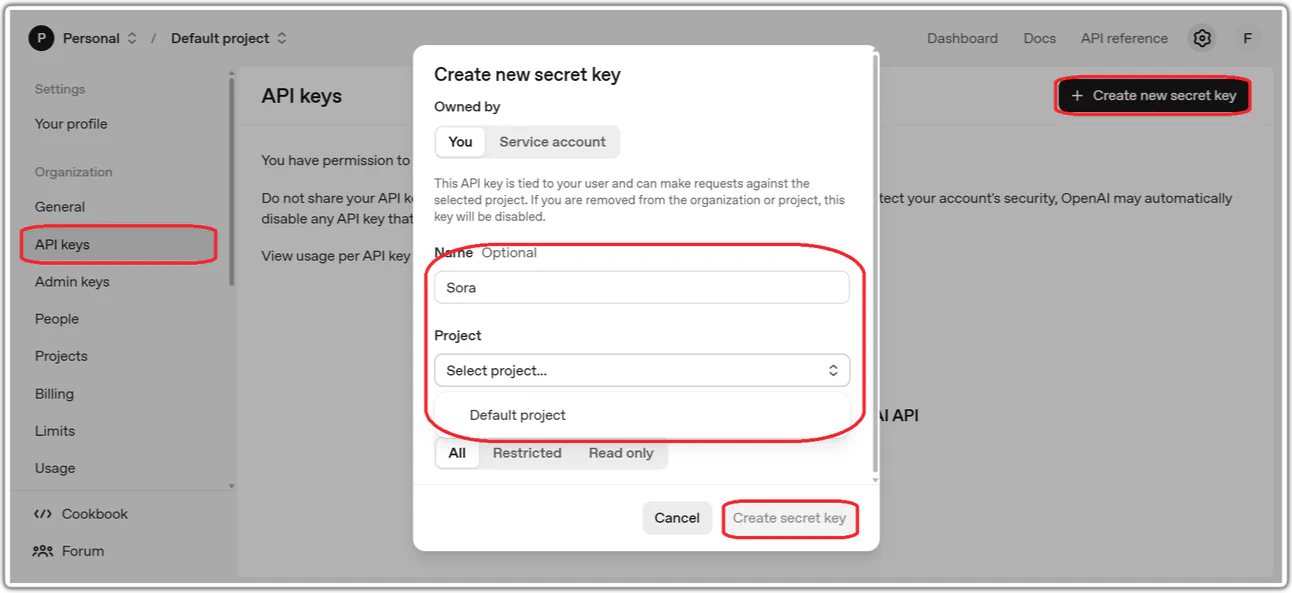
After loading the credits, you can finally create your key. In the left menu, go to the “API Keys” tab and click the “Create new secret key” button. Give your key any name (it can be “Sora”) and under “Project”, select the “Default project” that’s already there. Finish by clicking “Create secret key”.
With that, a pop-up will show up with a huge alphanumeric key: that’s your API Key! Save it in a notepad for now, because once you close that pop-up, you won’t be able to see it again (and you’ll have to recreate it if you haven’t saved it somewhere).
An important warning: NEVER SHARE YOUR API KEY WITH ANYONE, and don’t publish it on GitHub or anywhere else. Like I said, it’s like your username and password, and if someone gets access to it, they can use up your OpenAI API credits.
Step 3: Creating your videos
With the setup done, we finally got to the fun part!
First of all, I suggest creating a specific folder for this. I’ll call mine “SoraVideos” (all one word).
Open the VS Code you installed in step 1 (or another code editor) and click “File -> Open folder” and select the “SoraVideos” folder you just created (completely empty).
After opening it, go to “File -> New file” or use the left sidebar, and create a new file called just “.env”, with no extension. This is a file that will only store your API Key, so it doesn’t sit alongside the rest of the code (it’s a good practice so you don’t share it with anyone by accident). Inside this file, you’ll have just one line:
OPENAI_API_KEY=sk-Ea4.........
You’ll replace that “sk-Ea4…….” with your API Key, the one you generated in step 2. You can save it.
In the same folder where you created the file called “.env”, create a new file, which will be a Python file (you can call it “sora.py”, or whatever you like). Inside it, copy and paste the following code:
import os
import time
import json
import requests
from dotenv import load_dotenv, find_dotenv
load_dotenv(find_dotenv(usecwd=True), override=True)

API_BASE = "https://api.openai.com/v1"
API_KEY = os.getenv("OPENAI_API_KEY")
if not API_KEY:
    raise SystemExit("Defina a variável de ambiente OPENAI_API_KEY.")

def create_video(prompt, model, size, seconds):
    print(f"Enviando pedido: model={model}, size={size}, seconds={seconds}")
    r = requests.post(
        f"{API_BASE}/videos",
        headers={"Authorization": f"Bearer {API_KEY}", "Content-Type": "application/json"},
        json={"model": model, "prompt": prompt, "size": size, "seconds": seconds},
        timeout=60,
    )
    r.raise_for_status()
    return r.json()["id"]

def wait_until_ready(video_id):
    url = f"{API_BASE}/videos/{video_id}"
    while True:
        r = requests.get(url, headers={"Authorization": f"Bearer {API_KEY}"}, timeout=30)
        r.raise_for_status()
        data = r.json()
        if data.get("status") == "completed":
            return data
        if data.get("status") in {"failed", "error", "cancelled"}:
            print(f"GERAÇÃO FALHOU (status={data.get('status')}). Detalhes:")
            try:
                print(json.dumps(data, indent=2, ensure_ascii=False))
            except Exception:
                pass
            raise SystemExit(f"Falhou: {data.get('status')}")
        time.sleep(5)

def download_video(video_id, filename):
    url = f"{API_BASE}/videos/{video_id}/content"
    with requests.get(url, headers={"Authorization": f"Bearer {API_KEY}"}, stream=True, timeout=300) as r:
        r.raise_for_status()
        with open(filename, "wb") as f:
            for chunk in r.iter_content(1024 * 1024):
                if chunk:
                    f.write(chunk)
    return filename

if __name__ == "__main__":

    prompt = """
    CHARACTER: A professor, with glasses and a beard.

    SCENE: He is teaching a class. There's a big blackboard in the background.

    AUDIO: The professor looks at the camera and says "Learn how to use Sora with me!"
    """

    t_wait0 = time.perf_counter()

    video_id = create_video(prompt,
    model="sora-2",
    size="720x1280",
    seconds="4"
    )

    wait_until_ready(video_id)
    filename = f"{time.strftime('%H-%M-%S')}.mp4"
    path = download_video(video_id, filename)

    t_wait1 = time.perf_counter()
    elapsed = t_wait1 - t_wait0
    m, s = divmod(elapsed, 60)
    print(f"Vídeo pronto. Tempo de geração: {m:02d}:{s:02d} (mm:ss)")
    print("Arquivo salvo em:", path)
You don’t need to understand this whole code (the messages it prints on screen are in Portuguese, but that doesn’t affect anything), you’ll just have to change a few things. Near the end of the code, around line 70, you’ll have some choices (always keeping the text between quotes, like in the example):
- The model you want to use: “sora-2” (default) or “sora-2-pro” (better, but more expensive);
- The video format: “720x1280” (vertical, TikTok style) or “1280x720” (horizontal, YouTube style). With the “sora-2-pro” model, there are also bigger options ("1024x1792" for vertical and “1792x1024” for horizontal);
- The video resolution: “720p” (good) or “1080p” (excellent, HD);
- The video duration (in seconds): “4”, “8” or “12”.
And on top of that, the most important part of the whole process: your prompt!
There are lots of ways to engineer a prompt to generate a good video on the first try (or close to it). One that usually works well for me is splitting it into 3 parts: CHARACTER(S) (the character(s) in the scene), SCENE (what’s happening in the scene) and AUDIO (what the character will say, music, background sounds, etc).
You can follow this structure or not. Either way, around line 59, keep the 3 quotes above and below the text, and change it however you prefer. In the end, you’ll have something like:
    prompt = """
    CHARACTER: A professor, with glasses and a beard.

    SCENE: He is teaching a class. There's a big blackboard in the background.

    AUDIO: The professor looks at the camera and says "Learn how to use Sora with me!"
    """
Once you’ve set your prompt and the settings, we’re almost there!
(Optional) Creating a virtual environment
If you want to follow coding best practices, I’ll teach you how to create a Python virtual environment to install the dependencies. If not, you can skip to the next section.
If you decided to stay, before running the code, let’s install the missing dependencies. In your VS Code, go to the “Terminal” tab at the top, and choose the “New terminal” option. This will open a new terminal at the bottom of the screen. Don’t be scared! Since you already opened the folder in VS Code earlier, the terminal will already open in the right place.
First, run the command below:
python -m venv .venv
This will create a Python virtual environment, where we’ll install the dependencies. Now, we need to activate it.
If you’re on Windows, run the command below in the terminal:
.venv/Scripts/Activate.ps1
If Activate.ps1 gives you a policy error, run this first:
Set-ExecutionPolicy -Scope Process RemoteSigned
If you’re on macOS or Linux, run:
source .venv/bin/activate
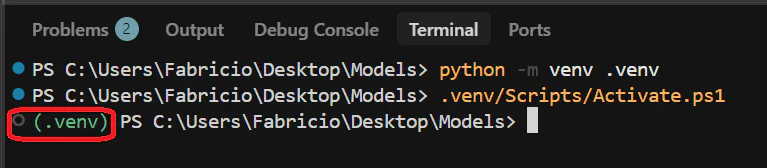
You’ll know the activation worked if a “(.venv)” shows up at the beginning of your terminal lines:
Generating the video
Whether you created the virtual environment or not, your next step will be installing the dependencies. In this case, there are only 2 that need to be installed (the rest all came with Python). You should run the command below in the terminal:
pip install requests python-dotenv
This will install the “requests” library (used to connect to the OpenAI API) and “python-dotenv” (used to read your API Key).
Now comes the moment you’ve been waiting for!
With everything installed, all you have to do now is run the Python code, which will generate the video you asked for using Sora. It’s very simple.
Assuming your Python file is called “sora.py”, just run the command below, also in the terminal:
python sora.py
On Windows, if that doesn’t work, it’s because you need to say you’re in the same folder. So use:
python .\sora.py
AND THAT’S IT!
The generation will start. For short videos (4 seconds, 720p), it usually takes between 1 and 3 minutes; for long videos (12 seconds, 1080p), it can take up to 10 minutes.
Note that, along the way, you may notice that the processing failed. That can happen for several reasons, but the main one is usually a block on OpenAI’s side. In the Sora app in the United States, creating videos with celebrities is still allowed, something that isn’t possible here, via the API. So a block for using copyrighted images or for violent, sexual scenes, etc., can happen.
Sometimes that block happens even for seemingly “harmless” scenes. If you think that was your case, just run the “python sora.py” command again, which might work.
And that’s it! In case you’re curious, this was the video generated by Sora 2 using the prompt from the code above, with the “sora-2” model, “720p” resolution and “4” seconds.
Any questions, feel free to leave a comment here :)
Hugs, and happy creating!