TUTORIAL - How to create an AI video of selfies with celebrities
Published on
You know those videos that have been all over social media lately, where someone takes a selfie with a celebrity, walks through the scene, takes a selfie with a bunch of other celebrities, with a perfect transition?
I was playing around with image and video generation AIs the other day and generated one of those videos that I posted on social media and it did really well. And since a lot of people asked me how to do it, I put together this guide to show you exactly how I made mine.
Step 1 - Take a selfie at a good angle
First of all, you need to take a photo of yourself, preferably using that classic selfie angle: holding the phone a little above eye level and with some space in the background. Try to do it somewhere with a neutral background (it doesn’t have to be a professional white wall, but the less clutter behind you, the better the final result).
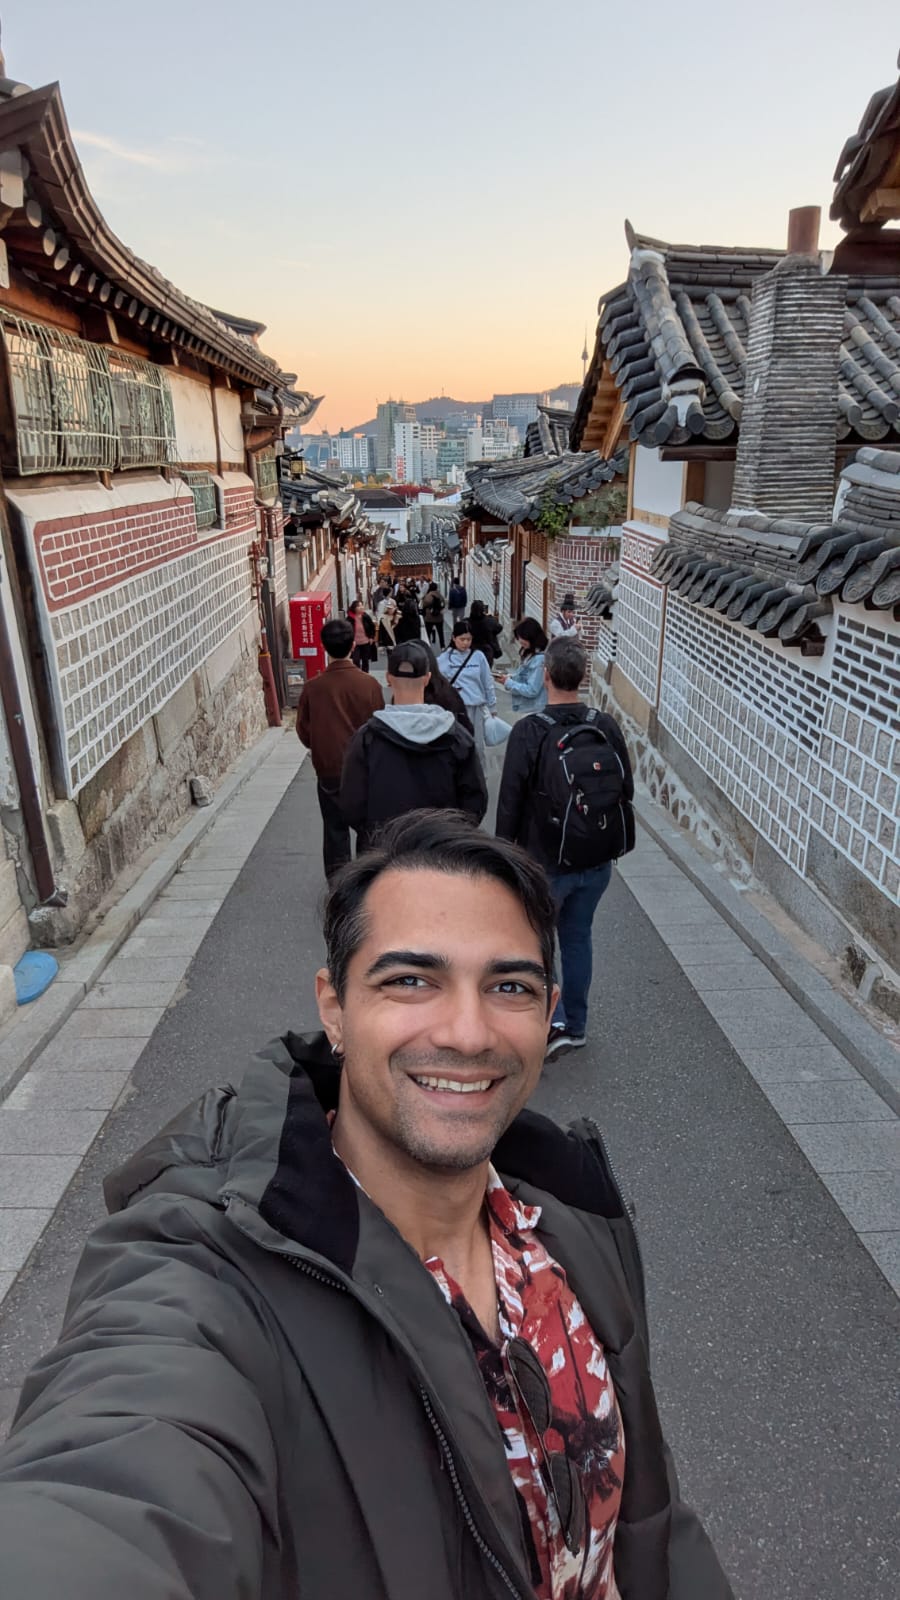
Since I was feeling lazy about taking a better one, the one I picked was this, from a recent trip to Seoul (not ideal, but it ended up working):
Step 2 - Choose the image generation tool
With the selfie done, picking the tool is what makes or breaks it. Right now, the best AI model for generating and editing images is, by far, Gemini’s (Google) Nano Banana Pro. The “problem” is that if you try to use the official Gemini site or ChatGPT’s image generator, you’ll run into copyright restrictions when you try to include celebrities. You can get around them in some scenarios, but it’s not really a good idea to keep pushing against that kind of limitation (and it takes a lot of time).
To get around this with good quality, I recommend using Higgsfield.ai. It’s a site that lets you generate images and videos with the best models on the market, including Nano Banana Pro itself, and without those restrictions on famous people. It has a free version that gives you 10 credits a day, but that runs out REALLY fast (like 4-5 images, or 1 video), so to do the whole job in one go and not have to wait a month to finish the video, it’s worth investing in the basic 10-dollar plan to get a much higher limit.
There are other similar ones, like Fal.ai, but I used Higgsfield AI.
Step 3 - Generate the selfies with celebrities
Inside Higgsfield, your first stop is the image creation tab:
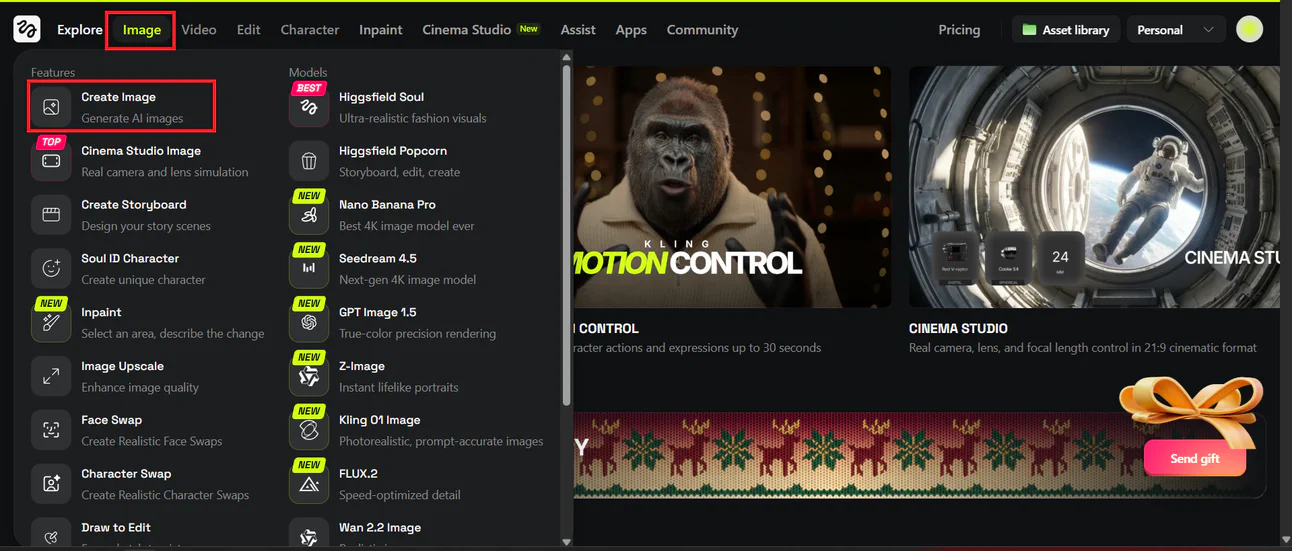
In there, you should set the model to Nano Banana Pro, the format to 9x16 (the standard vertical format for Reels and TikTok), and the quality to 2k (great) or 4k (excellent) - I used 2k. On top of that, you’ll click the “+” sign and upload that selfie you took:

In the prompt field, you’ll describe the scene, asking the AI to generate you next to the celebrity you picked. You can use the prompt below as a base:
Create a realistic, high-fidelity (8K), 9:16 format image based on the attached reference photo.
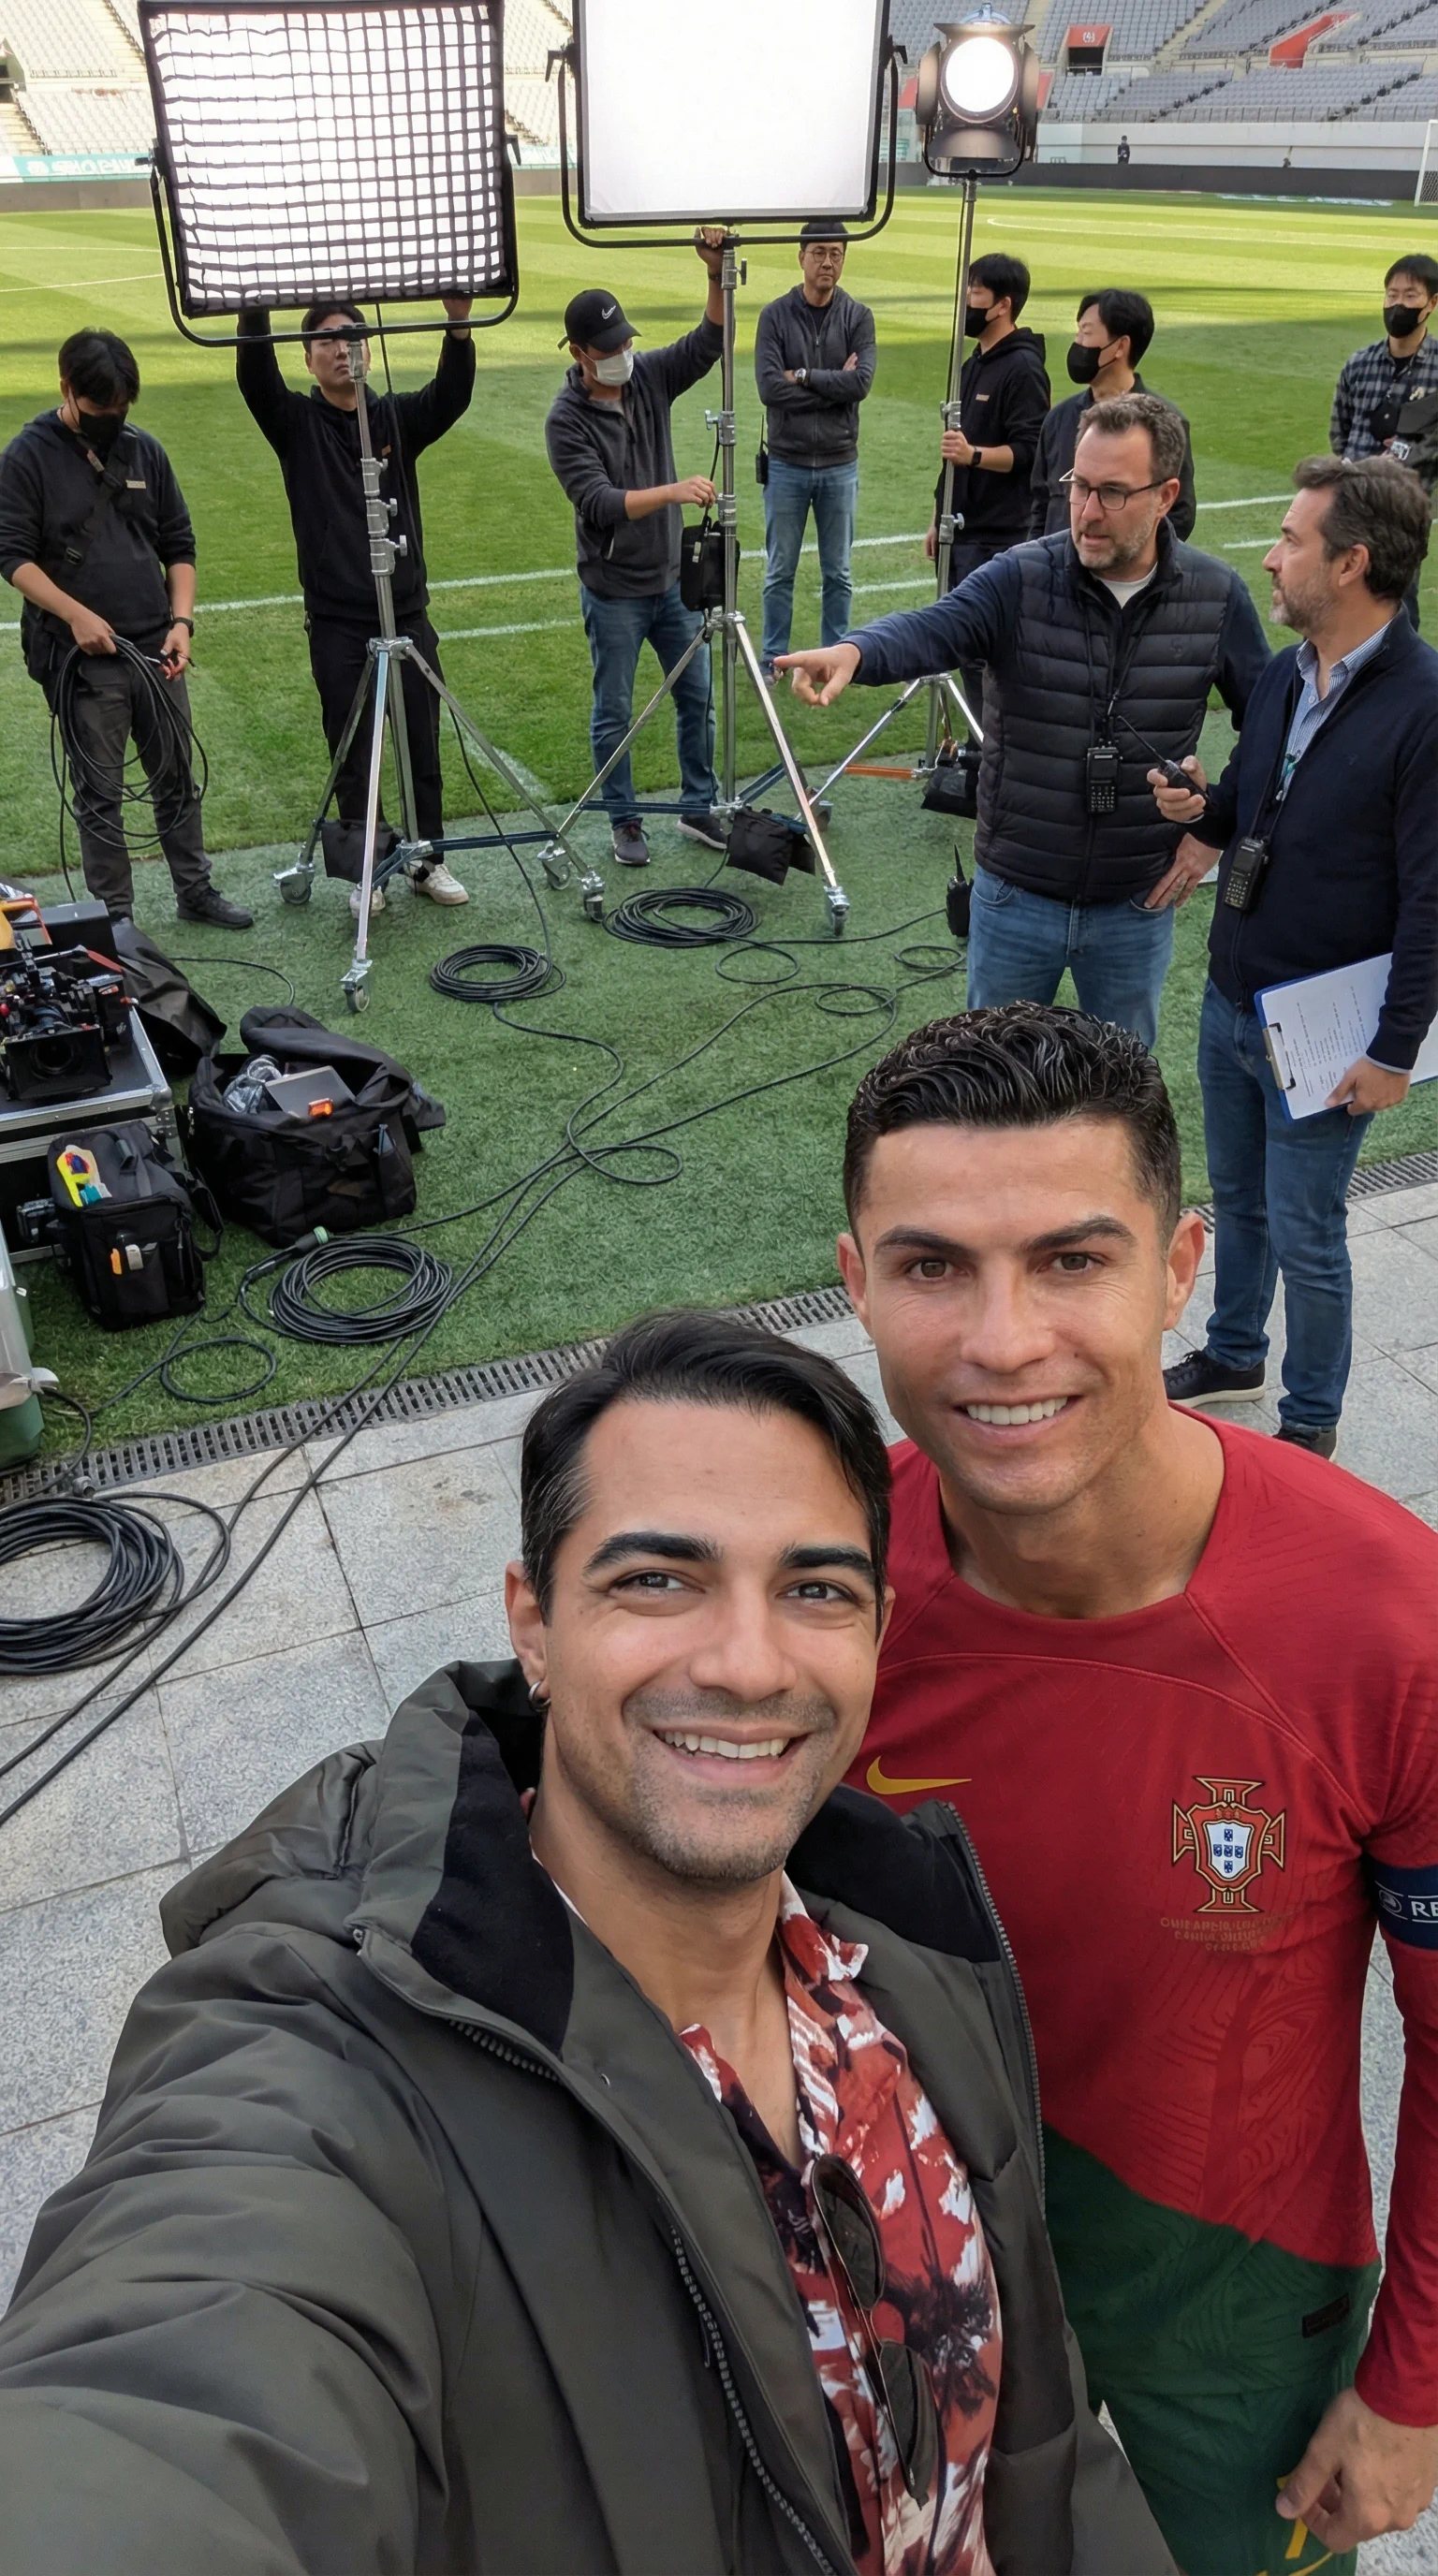
Maintain the exact facial features, skin tone, bone structure, hairstyle, and expression of the attached person, with no alteration or face swapping. The attached person is taking a selfie with Cristiano Ronaldo wearing his Portugal jersey, next to a soccer field.
Crew members are adjusting internal lighting and equipment, with cables and gear visible. Directors and managers are standing behind, discussing the next take.
You should replace the parts from “Cristiano Ronaldo” onward with the name of your celebrity and the setting where you want the selfie of the two of you together. It’ll generate something like:
From there, the work is basically “prompt + repeat”. Generate a selfie, download it into some folder (you can keep naming them “photo1”, “photo2”, etc.), and keep repeating the same process for every celebrity you want in your video.
And here’s something that’s totally normal: the first generation isn’t always good. Sometimes the composition looks weird, the face doesn’t fit that well, the framing looks way too “fake”, or the model makes up some strange detail. When that happens, you just generate again. It burns more credits, but it almost always gets better after two or three tries.
Step 4 - Generate the transition videos
With all the selfies ready, now you go to the video generation tab in Higgsfield:
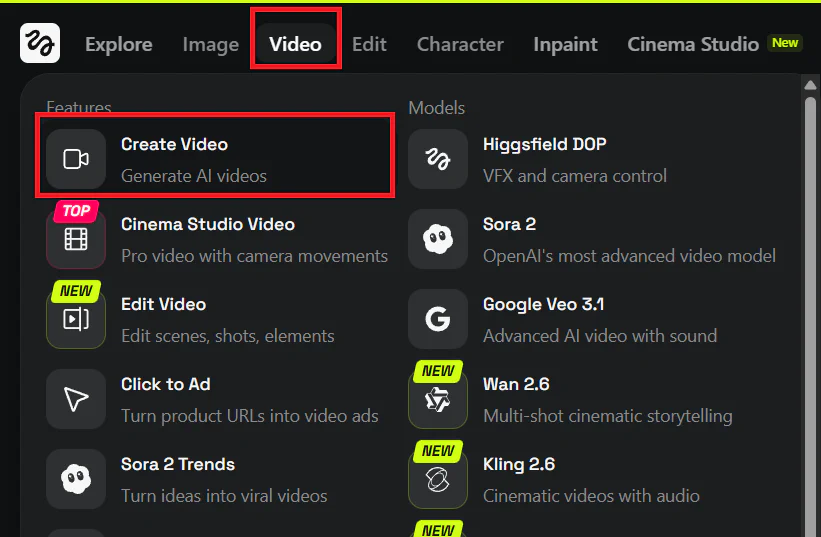
First, pick the following settings: model “Kling 2.5 Turbo”, duration of 5 seconds, and resolution of 1080p:
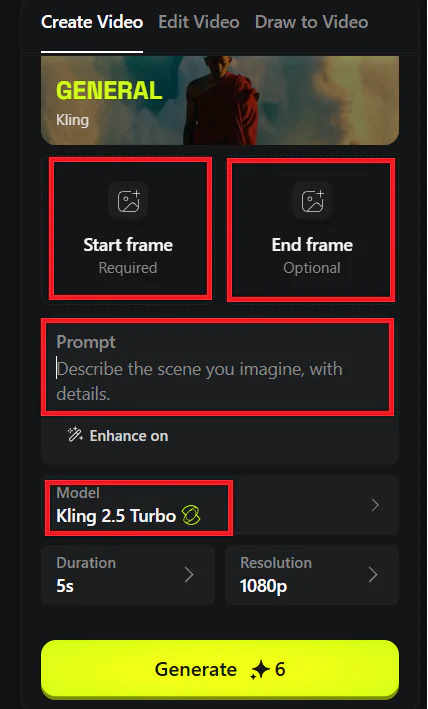
The big secret here is using the option to select the video’s start and end frames. For example, to create the first transition, you upload your selfie with Messi in the “Start frame” field (see the image above), and the selfie with Gandalf in the “End frame” field. Then, in the video prompt, you describe what’s happening and what the transition between the two frames should look like. You can use the prompt below as a base (and change whatever you want, like the celebrities’ names):
In the first frame, the person takes a picture with Lionel Messi.
He then runs toward another location, as seen in the final frame. He meets Gandalf on movie set of Lord of the Rings and takes a picture with him.
Selfie POV shot. The person is holding the camera with an extended arm while running. High angle selfie. The camera shakes realistically mimicking the running movement.
He keeps his head turned to the side, staring continuously at the passing movie set structures, never looking at the camera throughout the entire run.
That will generate your first video, which you can call “video1” and download, something like:
And then, the secret to making the final video feel endless and fluid is to work in a “chain”, meaning the second clip has to start exactly with the photo that ended the previous one.
This is where a lot of people slip up, so pay attention: you’ll create several videos, always in pairs of images, and the end of one video has to be the start of the next. So, if video 1 is Messi → Gandalf, video 2 has to start at Gandalf and go to someone else, like Gandalf → Shakira. Video 3 becomes Shakira → Cristiano Ronaldo, and so on.
That rule guarantees that, when you put everything together in the editor, the transition will be continuous and clean, with no weird jumps between one clip and another. And there’s one more cool detail: at the end, you need to “close the circle”. So if you started with Messi, the last video in the sequence should end on Messi, to give that perfect loop feeling.
By the end of this step, you’ll have several short videos: each one is a transition from one celebrity to the next.
Step 5 - Put it all together and add the soundtrack
The last step is to put all those videos you generated together in an editor. It can be CapCut, which is free, or any other one you already use.
The idea is to place the clips on the timeline in the right order, butting one against the other with no gap. Since the end of one clip is identical to the start of the next, the transition will be invisible and the effect looks really cool. Here, you just need to check that the sequence is correct: if one video ends on Gandalf, the next one has to start on Gandalf, and so on.
About music, you have two options. If you’re going to post on Instagram or TikTok, you can add the music directly in the platform. But if you plan to publish elsewhere (like LinkedIn) or send the finished file to someone, then it makes more sense to add the music in CapCut before exporting.
And that’s it! The process isn’t complicated: you generate the selfies, generate the transitions in pairs, and then just put it all together.
If you make a video like this, you can tag me on LinkedIn, I’d love to see it!