TUTORIAL: A guide to quantizing Hugging Face AI models to GGUF and running them with Ollama
Published on
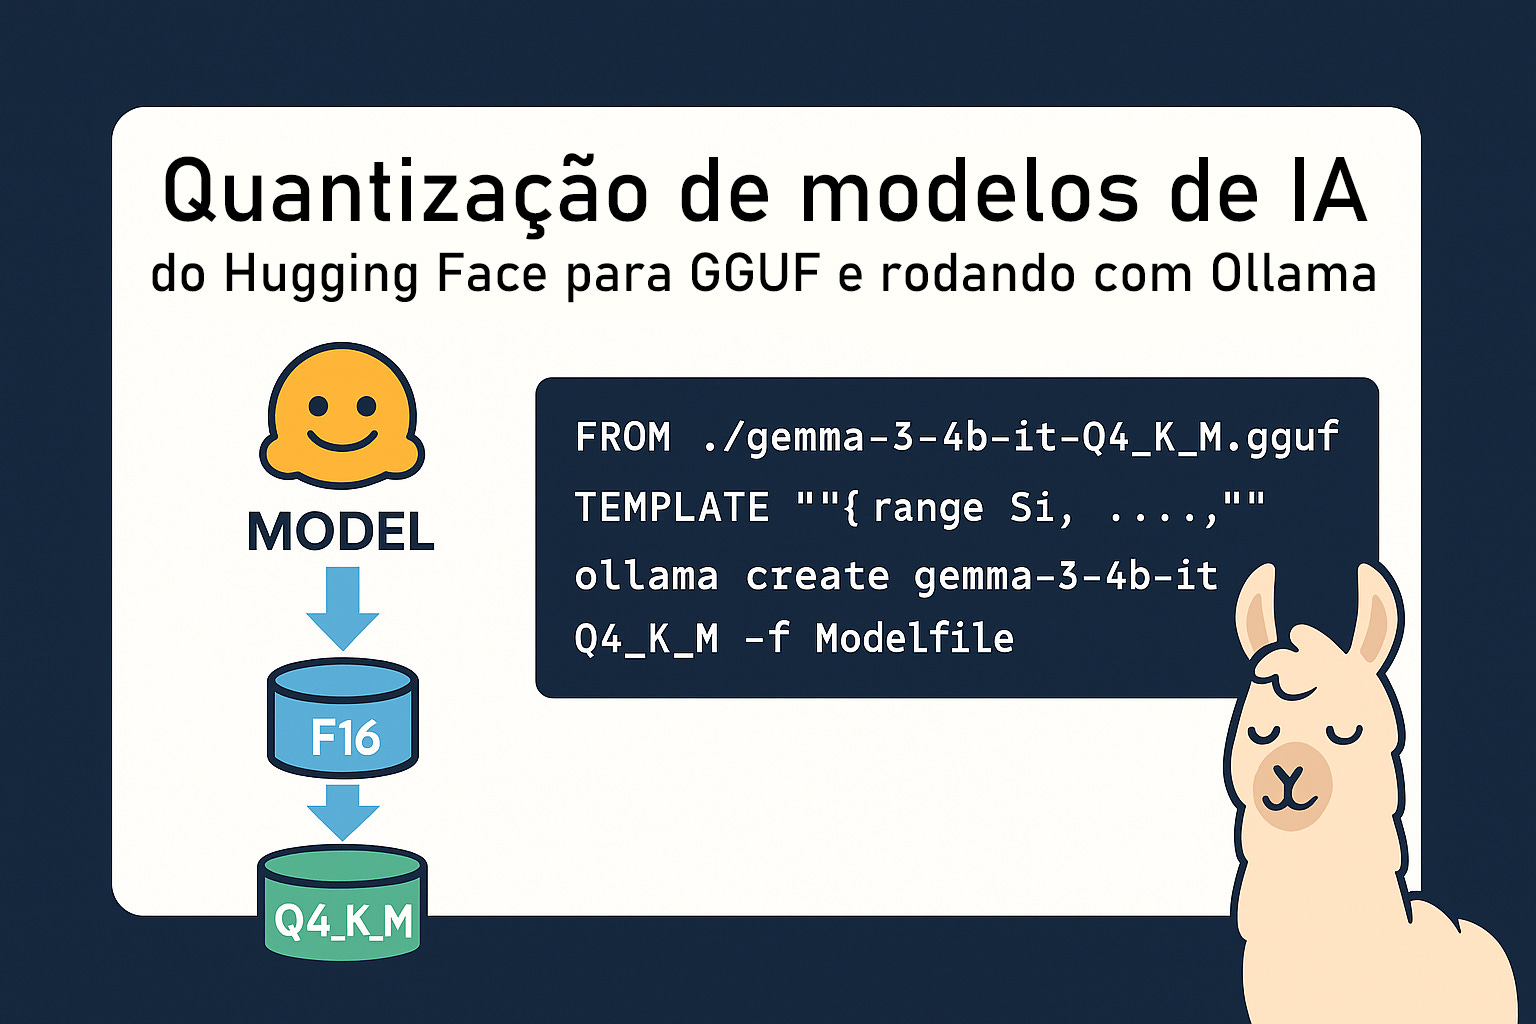
If you tinker with LLMs, especially the open source models on Hugging Face, you’ve probably wondered: how do I run these beauties more efficiently on my own machine, without a multimillion-dollar cluster of NVIDIA H100 GPUs? Well, one of the answers gaining more and more traction is quantizing these models and converting them to the GGUF format.
What is quantization?
Quantizing an AI model is a process to make it smaller and faster. Imagine that an LLM stores all of its knowledge as numbers with lots of decimal places (FP32 = 32 bits, for example), which takes up a lot of space and demands a lot of processing power.
Quantization is kind of like “trimming down” those numbers. We reduce their precision, for example by turning 32-bit floating-point numbers into simpler integers, or by using fewer bits (16, 8, 4) to represent each one.
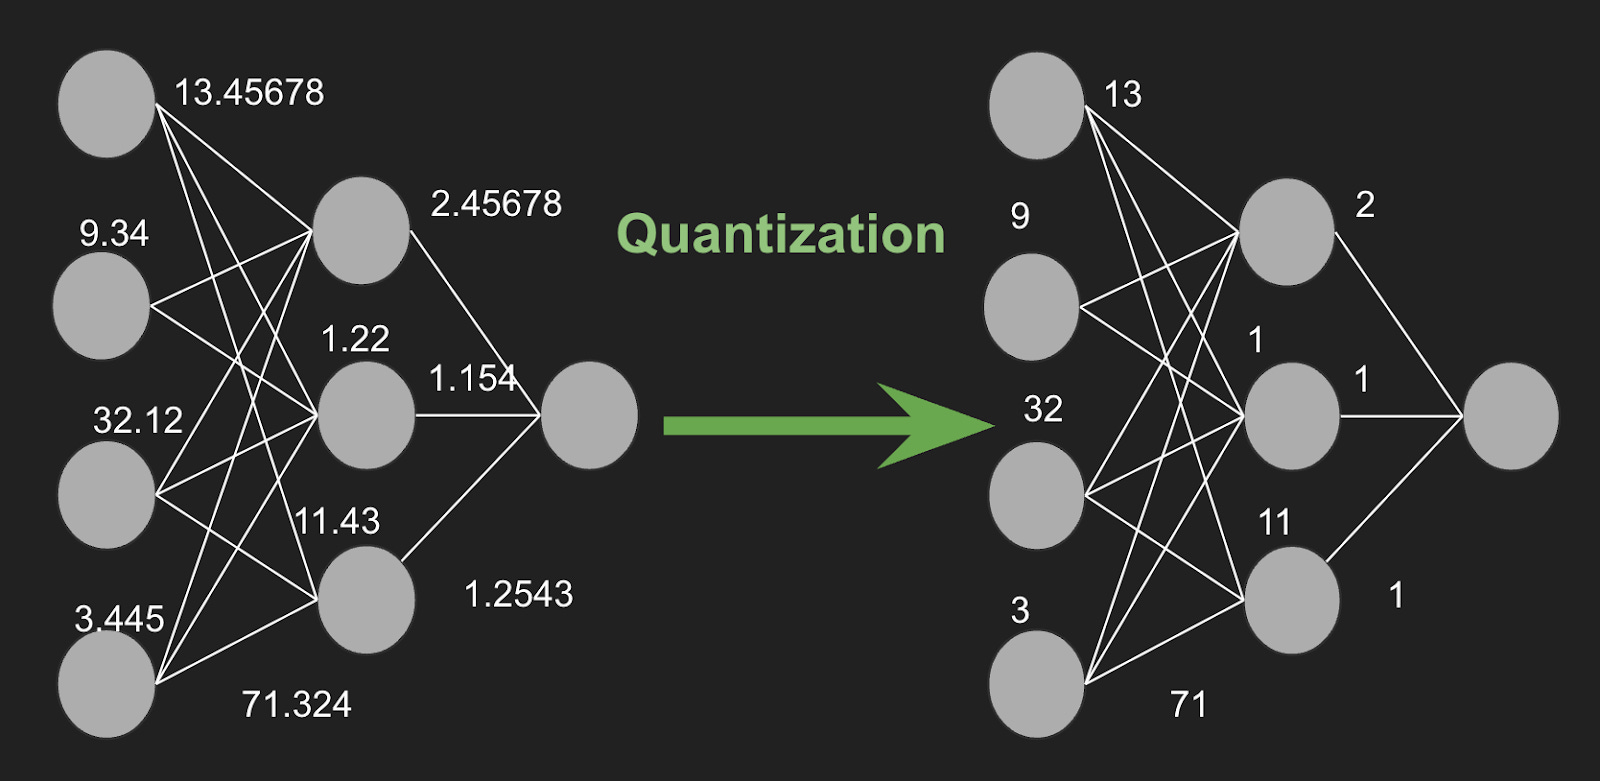
This numerical “compression” significantly cuts the size of the model and the amount of computation it needs to run, so it can do its job more efficiently and on devices with fewer resources, like laptops and even smartphones.
Example:
- Before quantization (32-bit float, or FP32): Each model parameter is stored as a 32-bit floating-point number. If the model has 7 billion parameters, the size works out to 7,000,000,000 parameters x 32 bits per parameter. Since 8 bits equal 1 byte, 32 bits equal 4 bytes, so that comes to 7 billion x 4 bytes = 28,000,000,000 bytes ≈ 28 GB.
- After quantization (8-bit integer, or INT8): The quantization process converts each 32-bit number into an 8-bit integer. Now we have 7,000,000,000 parameters x 8 bits per parameter. We already know 8 bits equal 1 byte, so that comes to 7 billion x 1 byte = 7,000,000,000 bytes ≈ 7 GB.
In other words, quantization cut the model size by 75%. Of course, there’s a small trade-off in precision, but most of the time, for inference (the model generating answers), the loss is minimal.
On top of that, with this reduction the speed at which the model generates a response (inference) also improves drastically. Calculations with integers (INT8) are much faster for modern processors than calculations with floating-point numbers (FP32).
What is the GGUF format?
If you haven’t run into this acronym yet, GGUF (which stands for GPT-Generated Unified Format) is a file format popularized and maintained by the community behind llama.cpp. Its big trick is being a format optimized for inference, which lets models run lighter, using fewer resources (especially RAM) and, often, straight on the CPU, which is a huge help!
The main idea behind GGUF is to make LLMs more accessible and practical to run locally. It supports different levels of quantization (a process that, simply put, reduces the precision of the model’s weights to cut its size and computational cost) very efficiently. That means you can take that giant model that would barely fit in your VRAM and turn it into something much more manageable, without losing that much performance in most cases.
The idea of this tutorial is to walk you through this process of quantizing and converting a “full” open source model from Hugging Face to this GGUF format, all the way to running it locally on your laptop or phone.
Shall we?
Quantizing a Hugging Face model
Step 1: Downloading the model from Hugging Face
First of all, we need to download the model we want to convert. For this tutorial I’ll use Gemma 3 with 4 billion parameters, “instruct” version (that is, fine-tuned to follow instructions and hold conversations like chatbots) from Google DeepMind. It’s available at: https://huggingface.co/google/gemma-3-4b-it
It’s a “gated model”, meaning you have to ask for permission to use it (like many others). You need to log in with your Hugging Face account and request access at the link above.
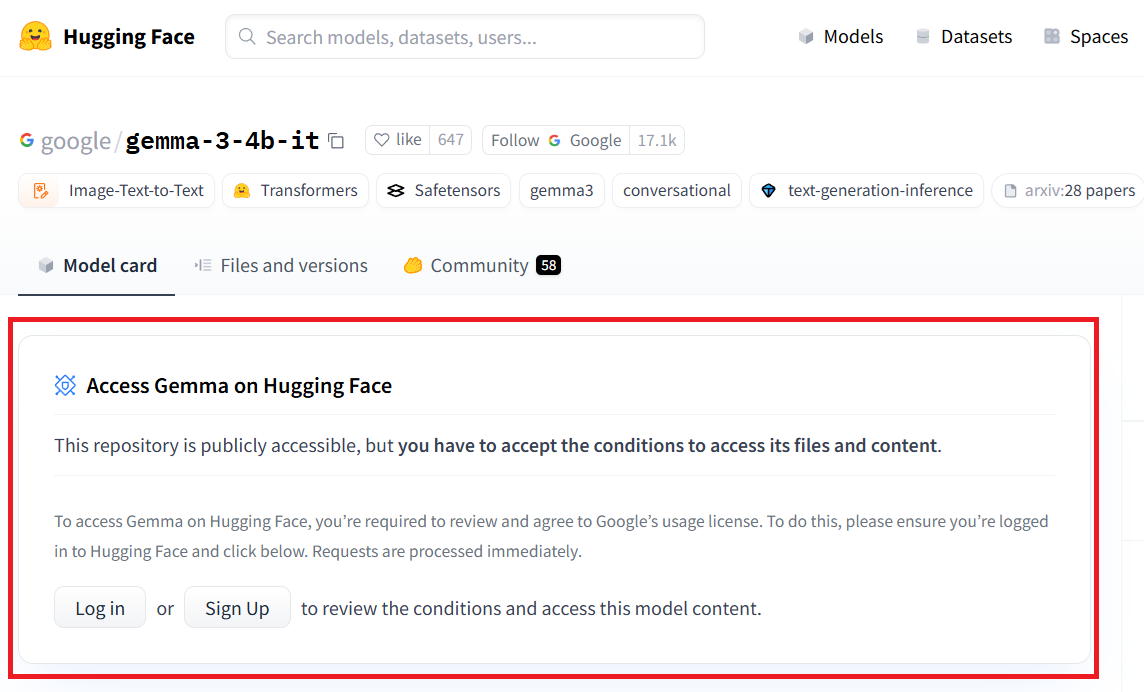
Once you’re approved (it’s pretty quick), there are two ways to download it. The first is the classic manual download: go to the model’s “Files and versions” tab above and download the files one by one. It works, but obviously it’s not the best method, especially for bigger models with lots of files.
The second (and the recommended one) is to use a download script that automatically downloads all of the model’s files.
What matters is getting the original model files (usually .safetensors or .bin files, plus configuration files like tokenizer.model and config.json) into a folder on your computer.
I went with the second option and wrote my own Python script. For that, you’ll need to install the “huggingface_hub” library on your machine:
pip install huggingface_hub
Since this is a restricted model, you’ll need a Hugging Face access token to download it (like an API_KEY). If you don’t have one yet, you can generate it here: https://huggingface.co/settings/tokens (and keep it in a notepad).
Next, save the code below in a file called “download_model.py” (you can use VS Code or any other IDE):
from huggingface_hub import HfFolder

HfFolder.save_token("SEU_TOKEN_DO_HUGGING_FACE")

snapshot_download(repo_id="google/gemma-3-4b-it")
Put the token you saved in the notepad into that “save_token” method. That “repo_id” is the title of the model’s repository on Hugging Face.
Finally, just run this little script in your Terminal or PowerShell with:
python <CAMINHO_DO_SEU_ARQUIVO>/download_model.py
It’ll take a while, because these models are several GBs.
If you go down this second path, the files of every model you download will be stored in the folder “C:/Users/<SEU_USUARIO>/.cache/huggingface/hub/” (Windows) or “~/.cache/huggingface/hub/” (Linux).
Inside the folder of the model you want (in our case, “/models–google–gemma-3-4b-it”), you’ll find a “/snapshots” folder, and inside it, a folder whose name is a mix of numbers and letters. Save that path in a notepad or something, because we’ll need it in Step 3. The whole path will look something like:
C:/Users/<SEU_USUARIO>/.cache/huggingface/hub/models--google--gemma-3-4b-it/snapshots/830sfs8090sdf9fs0sdjd908/
Step 2: Setting up the conversion environment
With the model in hand, the next step is to set up the environment we need for the conversion. The star here is the llama.cpp repository (from the genius Georgi Gerganov and the community).
So the first step is to clone that repository from GitHub into some folder (I’ll create one called “lcpp” right on my Desktop). In your Terminal, go to that folder and run:
git clone https://github.com/ggml-org/llama.cpp.git
The repository will be cloned into a new “llama.cpp” folder, inside that “lcpp” one. Go into that new “llama.cpp” folder with “cd” in the Terminal.
To run the system, I recommend creating a Python virtual environment. That makes sure llama.cpp’s dependencies don’t clash with other Python projects on your system. To create the environment, run this command in the Terminal or PowerShell:
python -m venv .venv
Now we need to activate the virtual environment. On Windows, you’ll run “.venv\Scripts\Activate.ps1”. On Linux, you’ll run “source .venv/bin/activate”.
Next, you’ll install all the necessary Python packages, which are listed in the requirements.txt file of the llama.cpp project. Inside the Python virtual environment, just run:
pip install -r requirements.txt
And with that, the environment is ready for the conversion.
Step 3: Converting to GGUF
With everything set up, let’s finally get to the conversion!
First, we convert the model to the GGUF F16 format (16-bit float). It’s a good starting point, because lots of models on Hugging Face can easily be converted to it.
Inside the “llama.cpp” folder, you’ll find a Python file called “convert-hf-to-gguf.py” (if you can’t find it, take a look at the repository’s documentation, since they may have renamed it - it used to be just “convert.py”).
Remember that path I asked you to save in the notepad? This is where we use it. You’ll type this in the Terminal:
python .\convert_hf_to_gguf.py <CAMINHO_GUARDADO>
Which, in the case of our example, will be something like:
python .\convert_hf_to_gguf.py C:/Users/<SEU_USUARIO>/.cache/huggingface/hub/models--google--gemma-3-4b-it/snapshots/830sfs8090sdf9fs0sdjd908/
But using the path you saved earlier, obviously.
The model in “.gguf” format will be generated in that alphanumeric folder inside “/snapshots”, with a huge alphanumeric name, similar to the folder’s name (in my example, something like “830sfs8090sdf9fs0sdjd908**-F16.gguf**”). I recommend renaming it to something more readable, like “gemma-3-4b-it-F16.gguf”. You’ll notice this file is about 7.5GB.
Step 4: Quantization
Now that we have our nice “.gguf” file, it’s time to really trim it down. Quantization, as I explained at the start of the article, is the process of reducing the numerical precision of the model’s weights. Instead of using 16 bits (or even 32) for each weight, we’ll use fewer, like 8, 5, 4 bits, or even less.
To continue, we have two options here: compile our llama.cpp executables (usually with a make), or, easier, download a build from the repository. I’ll go with the second option.
For that, just go back to the llama.cpp repository (https://github.com/ggml-org/llama.cpp) and, on the right side, below the “Releases” text, you’ll see the name of a build (something like b5709).
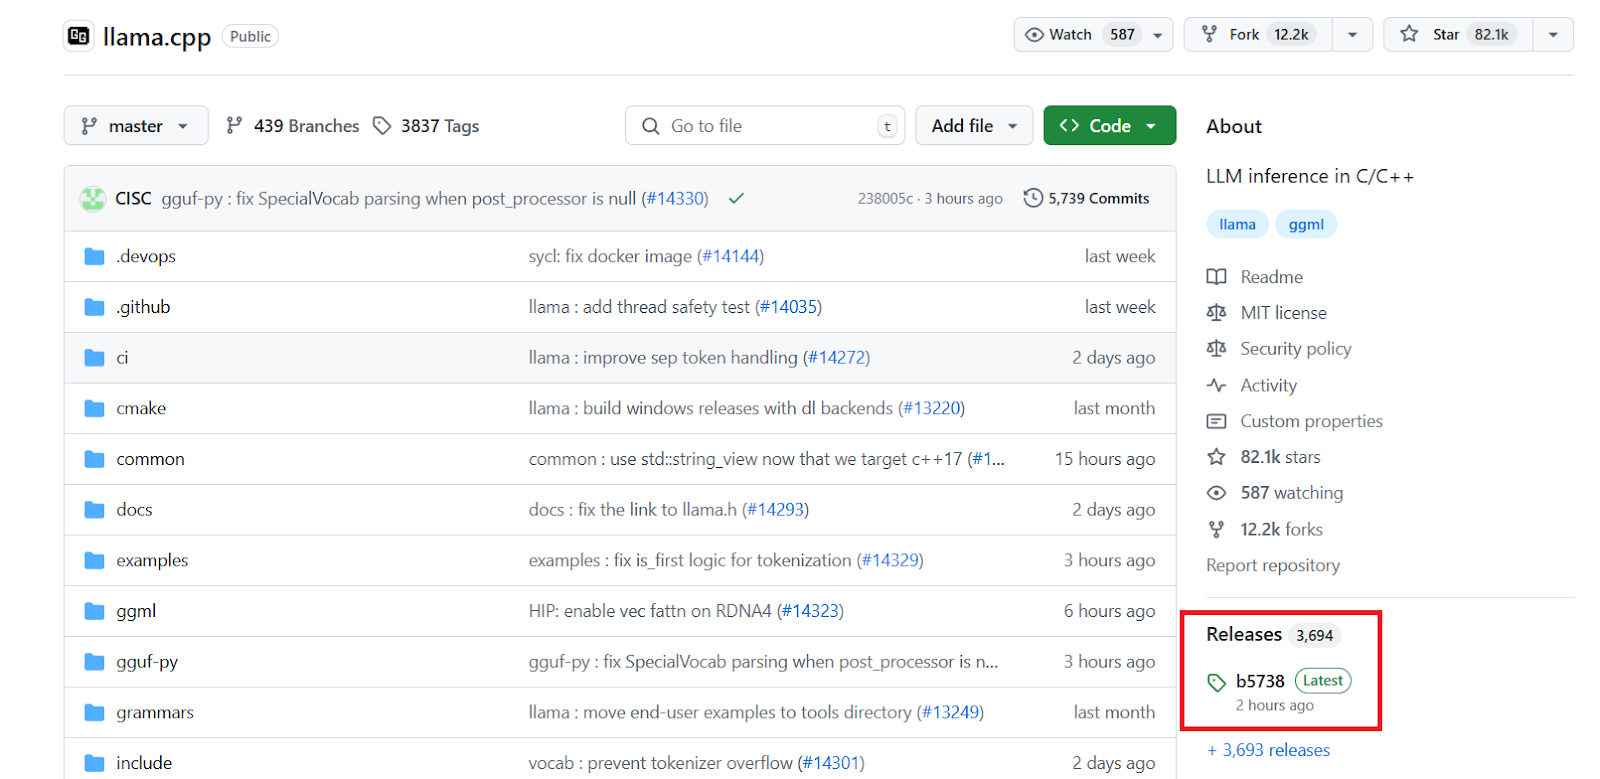
When you click it, you’ll land on the assets page. If you’re on Windows, download the version ending in “…-win-cuda-12.4-x64.zip”. If you’re on Linux, download the version ending in “…-ubuntu-x64.zip”.
After downloading and extracting the .zip file, you’ll see that the folder has a “llama-quantize.exe” file. With it, you can do the quantization, and this library offers several formats. Some of the most common ones you’ll see around are:
- Q3_K_S or Q3_K_M - small, very high quality loss
- Q4_K_S - small, considerable quality loss
- Q4_K_M - medium, good quality balance - recommended
- Q5_K_S - large, low quality loss - recommended
- Q5_K_M - large, very low quality loss - recommended
- Q6_K - very large, extremely low quality loss
Among many others. I’ll go with Q4_K_M quantization, which is very popular and offers a good balance between model size and performance.
In practice, Q4_K_M compresses the model to an average of 4.5 bits per parameter. The vast majority of the model’s data (the numerical “weights”) really is compressed to 4 bits each, but to avoid a big loss in quality, this format groups the weights into “blocks”. For each block, it stores extra high-precision metadata (called “scale factors” and “minimums”). That metadata works like an “answer key” that helps the model decompress the 4-bit values much more accurately.
Well, the moment of truth has arrived! In the Terminal, go to the folder you extracted from the zip (the one containing the “llama-quantize.exe” file) and type the command:
.\llama-quantize.exe <CAMINHO_DO_MODELO_F16_GGUF> <MÉTODO_DE_QUANTIZAÇÃO>
Which, in practice for our example, will look something like:
.\llama-quantize.exe C:/Users/<SEU_USUARIO>/.cache/huggingface/hub/models--google--gemma-3-4b-it/snapshots/830sfs8090sdf9fs0sdjd908/gemma-3-4b-it-F16.gguf Q4_K_M
And that’s it! The new quantized GGUF file in Q4_K_M format will also show up in the same folder, named “ggml-model-Q4_K_M.gguf”. Notice the difference in size: it dropped from 7.5GB to 2.5GB! Let’s rename it to “gemma-3-4b-it-Q4_K_M.gguf” to make our lives easier.
Now you can run it locally on your laptop or smartphone! But how do you do that?
How to run the quantized model locally
To run it on your computer, the easiest way is to download Ollama (https://ollama.com/). It’s a super useful piece of software that lets you run AI models locally.
After downloading and installing it, create a new file called “Modelfile” (it can have no extension, or .txt). Inside it, the first line will be the name of the quantized file:
FROM ./gemma-3-4b-it-Q4_K_M.gguf
Skip a line, and right below it you can add a system prompt. It’s the system prompt that tells the model who it is, what its persona is, and so on. For example:
SYSTEM """Your name is Gemma 3. You were created by Google Deepmind. You are a helpful assistant."""
But it’s optional. I will not use it in this example.
Skip one more line, and below it you must add the chat template. This is very important, because without it, the model will probably ignore the system instructions and/or won’t answer in the expected format (and it’s very likely to hallucinate).
To find the chat template, just look up the original model on the Ollama page (here’s the page for Gemma-3-4B-it, which we’re using: https://ollama.com/library/gemma3:4b) and click the “template” option. Type the word “TEMPLATE” in the Modelfile, and then, inside triple quotes, you can copy and paste the content you found under that “template” option.
All in all, the Modelfile will look more or less like this:
FROM ./gemma-3-4b-it-Q4_K_M.gguf

TEMPLATE """{{- range  , $_ := .Messages }}
{{- $last := eq (len (slice $.Messages $i)) 1 }}
{{- if or (eq .Role "user") (eq .Role "system") }}<start_of_turn>user
{{ .Content }}<end_of_turn>
{{ if $last }}<start_of_turn>model
{{ end }}
{{- else if eq .Role "assistant" }}<start_of_turn>model
{{ .Content }}{{ if not $last }}<end_of_turn>
{{ end }}
{{- end }}
{{- end }}"""
And it must be in the same folder as the Q4_K_M quantized model you generated.
All right, Modelfile created. Now go back to your Terminal or PowerShell. Go to the folder where the quantized model and the Modelfile are (you can put them together in a new folder, if you prefer), and run the following command:
ollama create gemma-3-4b-it-Q4_K_M -f Modelfile
This will register the model locally in Ollama. The Modelfile we created holds the path to the model and the template, to tell Ollama where it is and how it works. After that, just type:
ollama run gemma-3-4b-it-Q4_K_M
And that’s it! Ollama will run your model locally, and you can interact with it offline, as if you were talking to Gemini online or via API.
How to upload your quantized model to Ollama
One last thing you might want to do is share your freshly quantized model with the community through Ollama, and doing that is pretty easy!
First of all, you’ll need to create a user account at https://ollama.com/
Once it’s created, click your photo (in the top right corner of the page) and go to “Settings”, and then “Ollama keys”.
Meanwhile, on your computer, go to the folder “C:\Users<SEU_USUARIO>.ollama” (Windows) or “~/.ollama/” (Linux). In it, you’ll find a file called “id_ed25519.pub”. Right-click it and open it with Notepad. It’ll have something like:
ssh-ed25519 <TOKEN_ALFANUMÉRICO>
Copy the entire line above, go back to the “Ollama keys” tab in your browser, and paste that line into the empty field:
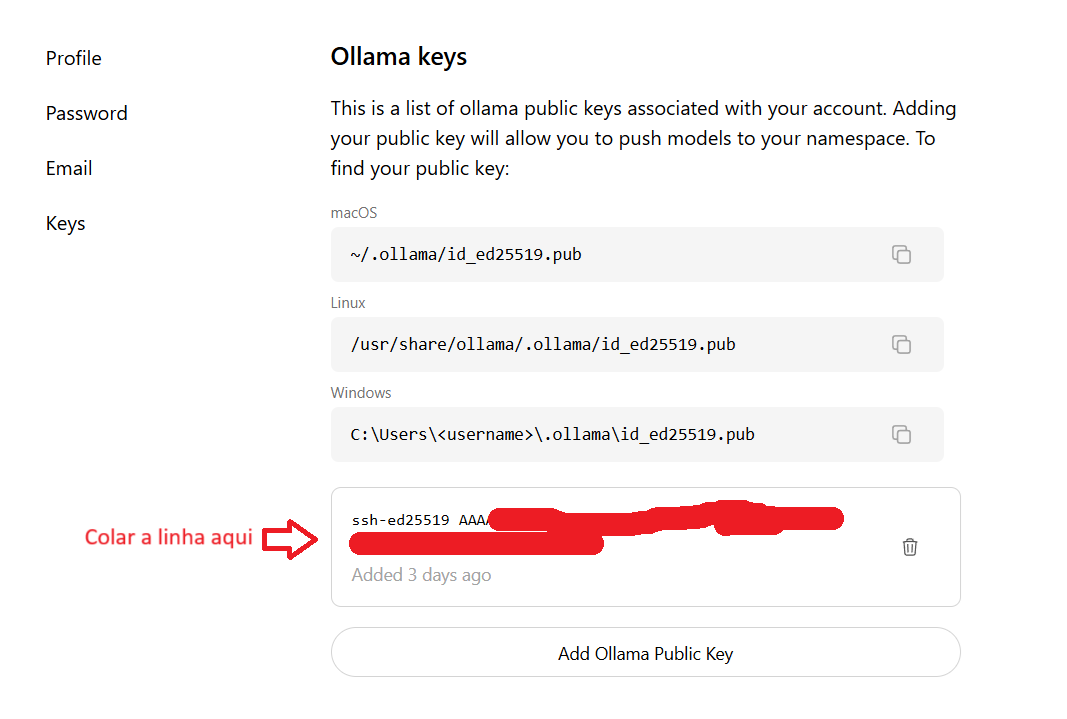
Now your local Ollama is connected to your Ollama account.
If you already ran “ollama create” in the previous section, you can skip to the next paragraph. If not, run:
ollama create gemma-3-4b-it-Q4_K_M -f Modelfile
Next, you’ll need to add your username tag and the name you’ll use for the model. Run this in the Terminal:
ollama cp <NOME_LOCAL_DO_MODELO> <SEU_USUARIO_OLLAMA/NOME_DO_MODELO_NO_OLLAMA>
Which in my case will be something like:
ollama cp gemma-3-4b-it-Q4_K_M fabriciocarraro/google-gemma-3-4b-it-gguf
Finally, all that’s left is to “push” the model to Ollama:
ollama push <SEU_USUARIO_OLLAMA/NOME_DO_MODELO_CRIADO_NO_OLLAMA>
In my case:
ollama push fabriciocarraro/google-gemma-3-4b-it-gguf
And that’s it! Your quantized model will be available on Ollama for anyone to download and run locally. Congratulations!
How to run Ollama AI models on your phone
For that, there are specific apps.
Google recently released Google AI Edge Gallery. It’s not available in every location yet, but it’s a great initiative from a big company.
For Android, one of the most widely used is PocketPal AI. With it, you can connect to the quantized models available on Hugging Face, or upload one locally from your phone and run it (as long as your RAM can handle it).
For iOS, besides PocketPal AI, Private LLM also stands out.
Conclusion
By following this step-by-step guide, you can take any language model from Hugging Face and convert it into an optimized, quantized GGUF format. You can also run it locally on your laptop using Ollama, an extremely useful tool.
And don’t forget: the community is your ally! Plenty of models already come ready-made in GGUF format on Hugging Face (look for files with that extension, or for repositories from users like “TheBloke”, who does an amazing job putting these models out there).
My tip is: experiment! Don’t be afraid to try different quantization methods, compare the results, and see what works best for your specific use case. Sometimes a more aggressive quantization can be perfectly acceptable for certain tasks, while others will need a bit more precision.
Good luck with your quantizations!